Pages / Tabs

Sunday, May 25, 2014

Stampin' Up! Paper flower cards

Stampin' Up! products are so varied and today I wanted to show you a couple of cards that were created using punches and the Stampin' Up! Big Shot machine.  Embossing folders were used to texture contrasting background papers; the flowers were created from a Big XL die and the leaves were created using a sizzlits die.  Punches were used to make the centre band and highlight the stamped greeting.

Pink Pirouette with Wild Wasabi on a background of Soft Suede
So simple yet gorgeous...

Soft Suede, Pink Pirouette
Rose created this one - stunning...

Created by Rose Christian - stunning to say the least

In gold, Marina Mist and Real Red this card is highlighted with silver glitter paper and Wild Wasabi.  A prize for any Mum on her birthday or for Mother's day or just to say thank you.

Thank you so much for stopping by,
I hope to see you soon

Friday, May 23, 2014

Step-side Cards - Version 2

To show case the second version of the side step card and use of Stampin' Up! stamps, I've saved my favourite for this post...this is a side step card also, but has two valleys and three mountains.  This is the same template I used for Ben's 4th Birthday card invitation. 

The card fold template - noting that the cut line can be moved to the left or right to suit your card...

Heather Baker, this is beautiful and so purrrfect to welcome a little girl  LOVE IT ...
In pink pirouette, the card is lightly embossed with small hearts (non-SU) and sponged in Melon Mambo.

The card is accentuated with the animals from Stampin' Up! rubber stamp set "Zoo Babies"

The verse was printed out on Whisper White card stock...

Isn't it just gorgeous!  The brads really finish it off as does the little fold of ribbon/clothing poking out of the draw.

Now for a little boy, again thanks to Heather Baker
Heather's beautiful Step Side card featuring Stampin' Up! Zoo Babies.
This is such a beautiful card fold and as you can see from this and the previous post, you can dress it up anyway you wish.  Love it.

Thank you for stopping by, hope to see you soon
Stay warm

Thursday, May 22, 2014

Step-side Cards - Version 1

Side step cards are versatile and very simple to make.  With Stampin' Up! stamps and designer series paper, the creations are endless. Here are just a few of the cards made during my classes the past month featuring Stampin' Up! Stamps and Designer Series Papers.

I made a simple side step card for Benjamin's 1st Birthday and this was the result..

On Marina Mist with the invitation inside, this is the card the majority of those invited received.


You can see the invite to the left and I placed a picture of Ben on the right.
This was so popular I held a class and this is what the participants made

This is a  great card made by Sherenne using the ever popular Stampin' Up! set "your my hero"
This card was made and sponged with white craft ink and the draw knobs were made out of Stampin' Up! clay, how great does this card look!
The Dress Up Framelits features in the above and below cards - these are a must have item as they can be dressed up or down and the styles changed as well.

Other participants added flowers to give the card a different slant

This is the template for the card size, where to cut and score...


The card can be dressed up for any occasion and the side with folds can be modified in length and number of folds.  The next post looks at another template with 2 valleys and 3 mountains as apposed to this one with 1 valley and 2 mountains.

I look forward to seeing you at the next post and boy are you in for a treat!  Heather made a BEAUTIFUL baby's card I am sure you will love.
 
Thanks for stopping by and having a read, please leave a comment, I would love to hear from you.

Monday, May 19, 2014

Fussy Cutting a Stampin' Up! featured card edge

Fussy cutting and edge of a row of stamping looks fantastic and is very effective on both male and female cards.  I have held a couple of classes and we made the following cards using Stampin' Up! Rubber stamps Secret Garden, Papillion Potpourri, Flower Shop and By the Tide.

Fussy Cutting is simply cutting a couple of millimetres around the stamped image - in this case we fussy cut around the flowers stamped on contrasting white card and then fussy cut the coloured base card, after adhering the feature card.

Rich Razzleberry and Garden Green
Stampin' Up! Papillion Potpourri in Perfect Plum...

Perfect Plum on Pool Party
Stampin' Up! Flower Shop with a little bling...

Rich Razzleberry on Old Olive
 One for the boys who love fishing...
Marina Mist all the way
Stampin' Up Papillion Potpourri in Perfect Plum...
Perfect Plum all the way
This card was inspired by Dawn Griffith, one of my favourite Stampin' Up! demonstrators.  Check her video out HERE to watch her make a very similar card - I just added a strip of Designer series paper to exaggerate the effect of the fussy cutting.
Melon Mambo on Old Olive
Add a contrasting Designer Series Paper (DSP) on the inside of the card to lift your fussy cutting, layer images and add a little bling and a sentiment and your card is finished.  So simple yet so effective.

If you need fine sizzors to undertake your fussy cutting, e-mail me and I will get for you Stampin' Up! paper snips (103579)

Saturday, May 17, 2014

Card in a Box with Stampin' Up!

The card in the box has been a much loved class and the following pictures are of those boxes made by some dear crafty cats. To learn how to make these beautiful boxes by visiting HERE.  The ever popular Stampin' Up! Flower Shop and Petite Petals was the main two stamps sets used in creating these gorgeous cards.  These cards were made by the wonderful and inspiring PLR ladies
A Crafty Cat: Stampin' Up! Flower Shop featured on this Card in a Box

Old Olive made for a stunning background...
A Crafty Cat: Stampin' Up! Flower Shop featured on this Card in a Box

A Crafty Cat: Stampin' Up! Flower Shop featured on this Card in a Box
Marina Mist looks stunning with these gorgeous sea creatures from the stamp set "By the Tide"
Colleen's card features "By the Tide" by Stampin' Up!
Flowers and butterflies make a gorgeous gift...
A Crafty Cat: Stampin' Up! Flower Shop featured on this Card in a Box
Love them, then click HERE for the link to a wonderful video, showing you how to make them and please send me a pic of your creation,

Love

Thursday, May 15, 2014

Card in a Box with Stampin' Up!

Today's post is a feature on a very talented customer Rachael Norris. This beautiful Card in a Box was created by Rachael Norris, using the rock and roll technique, with the ever popular Stampin' Up! Flower Shop and Petite Petals. To learn how to make these beautiful boxes by visiting HERE

A Crafty Cat: Stampin' Up! Flower Shop & Petite Petals; Card in a Box by Rachael Norris
These cards are a beautiful gift to anyone...
A Crafty Cat: Stampin' Up! Flower Shop & Petite Petals; Card in a Box by Rachael Norris
 You can personalise the box with a message on the back...

A Crafty Cat: Stampin' Up! Flower Shop & Petite Petals; Card in a Box by Rachael Norris
 The beautiful creation closes to that it is presentable and able to be sent in the mail - may cost a bit extra though!....

A Crafty Cat: Stampin' Up! Flower Shop & Petite Petals; Card in a Box by Rachael Norris

The detail on this card is just stunning,

A Crafty Cat: Stampin' Up! Flower Shop & Petite Petals; Card in a Box by Rachael Norris
Thanks Rach for allowing me to show case your gorgeous card,
Stay posted as I have many more cards in a box to share with you
Yours in paper craft

Monday, May 12, 2014

A Dinosaur Train Birthday Party - The Fossil Dig

The children's program, Dinosaur Train has been in our house for just over 18months now and I cannot speak highly enough of it.  This year my gorgeous son wanted a Dinosaur Train themed Birthday party and of course that meant a fossil dig......
The boys in the sand pit digging, looking, searching for fossils.
To start I had to make the fossils - plaster of paris was the medium with which we worked with.  I had to employ my husband to tap the Vaseline lined moulds as I made and poured the liquid in.  He then set them in pre made sand moulds to hold them horizontally.  We were able to make two of each mould on the first day so two and a bit days later, we got our three bodies - skeletons??


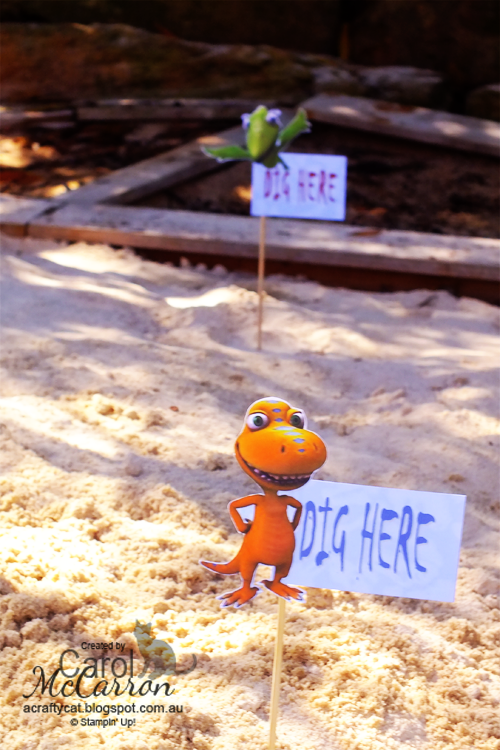
It was so much fun burying them and then denoting their locations with cute signage :-)
I put little signs featuring Dinosaur Train characters, to tell the children/adults where to dig

I put little signs featuring Dinosaur Train characters, to tell the children/adults where to dig
It rained on the party day so we waited for the ground to dry out and went fossil hunting with a couple of Ben's friends. 

Then the dig began
the find - a skull!
and fossils were discovered...
Brush, Brush
and uncovered...more brush, brushing
 
 
and then carefully moved and reconstructed...


 Love the finished products...

 
Sadly only two of the fossil bodies survived the rain - I must not have mixed the plaster of paris up correctly or I did not give it enough time to dry before burying the pieces - not sure what I did incorrectly there - maybe a bit of both.

Because this was enjoyed so much by the children, we are going to rebury these in the kindy sand pit so the entire class can discover the excitement of being a palaeontologist.

Saturday, May 10, 2014

A Dinosaur Train Party - Dinosaur Tail Pattern

Dress up is so much fun, and I found out how much fun it can be with these dinosaur tails, made for my son's Dinosaur Train themed 4th Birthday party. 


Our gorgeous son in his dinosaur costume.
I found one awesome site RUNNING WITH SCISSORS detailing how to make dinosaur tails, and it is this site that inspired me to make dinosaur tails for my son's 4th Birthday party themed after Dinosaur Train.   I am not an experience sewer, hence I wanted to minimise my time at the machine.  I decided to use the fold of the material to minimise one sewing edge of the tail and I used stiff felt instead of sewing the armour/sails endemic to each species of armoured dinosaur and I wanted more than the generic spikes of the Giganotosaurus.  I also wanted to remove the stuffing easily for washing and I wanted to stuff these tails cheaply - with shredded paper. 

So how did I do this? my instructions are probably not as good as running with scissors, but please go back to their site and go through the detail - my pictures should then make sense.  I did my tails in expensive patchwork material - it was soooooo pretty and scale like! and I allowed 30 inches per tail.  A much cheaper version would be in basic one colour fabric.  I free hand drew the tail shape onto Stampin' Up! packing paper - as you can see used, but never the less it did the job.


The first step was the pattern, I made my tails 25" long and ran the flatter side along the fold line.  The tails were 10 1/4" wide - 20 1/2 when the fold is opened flat.   The straps varied but 12" seemed to work (ND need 2 of these ie 4 in total if not on a fold line) and the 3/4 circle diameter was  6 1/2".  I used one of my son's cereal plates. 
This is the pattern cut out and pinned ready for sewing.  Yes that is my mud map/pattern in the top RHS corner...
 
I cut these shapes out of stiff felt.  I have degeneration in my shoulders, along with arthritis in my hands so I wanted to minimise sewing.  I did end up cutting two each for the tails of the Steg and Wuerhosaurus...just to be anatomically correct!

 The spikes/armour was placed inside as show below with the spikes facing toward the fold line.  These are the pieces after sewing.

And pin the straps inside of the tail (which is inside out) AFTER you have added your Velcro - sorry I didn't photograph the Velcro on the straps.

You may need to pin the first spike out of sewing ways harm ...
These are the circular pieces set on each other to make a circle.  This is the entry point to stuff the tail and although none of our stuffing came out, you may like to add a clip, spot of Velcro or a button to seal the opening more securely. 
I doubled sewed for strength and appearance more than anything.
This is the circle pinned on - note the pencil marks...I used these to line up with the inside of the tail to ensure even ruffling/gathering.
 Once this was sewn on, turn them inside out and stuff them...

 The tails on display, ready for the picking

 Stegosaurus

Hesperosaurus

 Wuerhosaurus,

 Giganotosaurus

A very BIG thank you to Running with Scissors for inspiring me to sew Dinosaur Tails for our wonderful son.  I hope you have as much fun with these at your party as we did.