Sunday, October 14, 2012

Big Shot - How to Use

Hi again,
I've had saved and not published a number of posts; not published because I don't have great quality photos and little time to retake them or manipulate them in a photo editing program.  I've had many requests to publish this one, so although the photos are not crash hot, I hope the information I provide is of value.
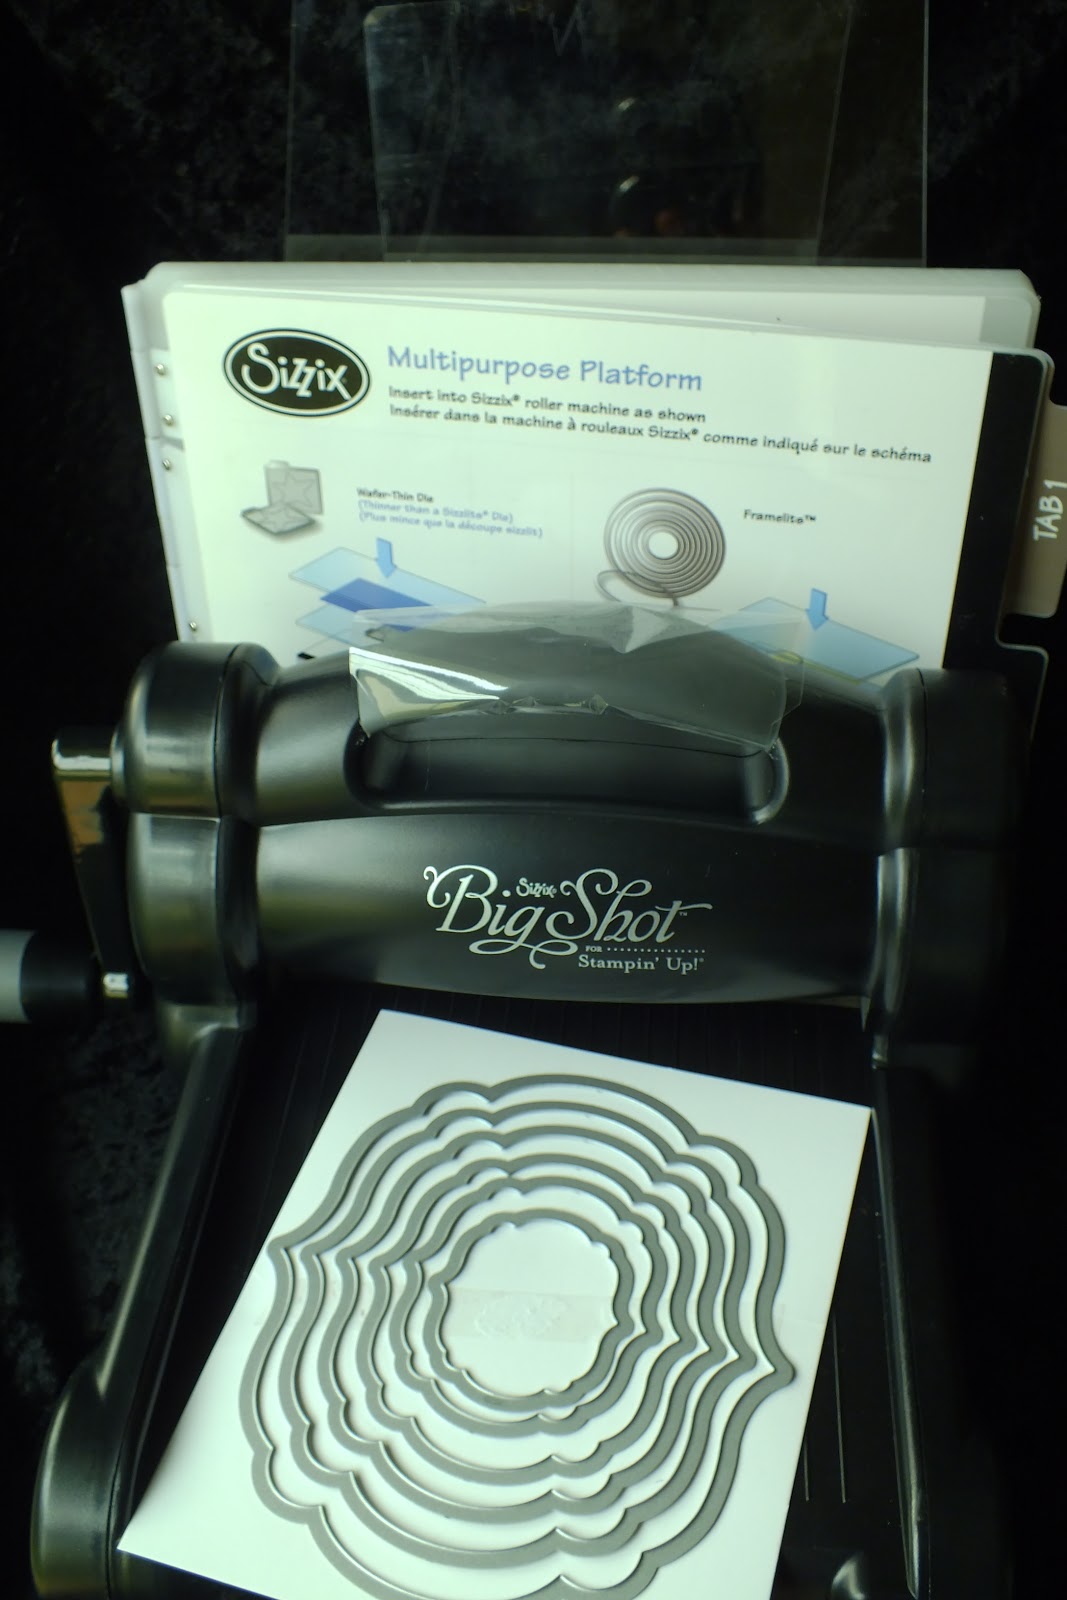
The big shot and an example of the different types of dies and embossing folders that can be used in with it.
 I guess the most important thing is to know and understand your machine.  If you understand it is essentially a press, you will know what to do when things are not quite right.  Below are examples of what you use with tab one on the multipurpose platform and both cutting plates. 

Behind the big shot is the multipurpose platform and on the tray of the machine is an Embosslit die (back LHS), textured impressions embossing folder (TIEF) and Sizzlits die (front LHS)

  The layering order for embosslit dies, embossing folders and sizzlits dies is simply 

  • the multipurpose platform on TAB 1
  • a cutting plate
  • the die or embossing folder with the card stock/material in the die/folder NB direction - (with the open edge of the die/folder entering the press first as pictured below)  the hinge should be the last thing to pass through the press/big shot.
  • topped with the second cutting plate.
Layering for Embosslit Die
Layering for Textured Impressions Embossing Folder


The layering order for the Sizzlits die is simply 

  • the multipurpose platform on TAB 1
  • a cutting plate
  • the die 
  • topped with the second cutting plate

Layering for Sizzlits Die
 TAB 2 on your multi purpose platform is used for wafer thin dies.

SU Wafer Thin Framelits Die125598 Labels Collection


  The layering order for wafer thin dies is simply 

  • the multipurpose platform on TAB 2
  • a cutting plate
  • the paper or image you wish to cut out
  • the die with the lip facing down
  • topped with the second cutting plate
Layering for Wafer Thin Dies

The die facing up and down so you can see the difference and position it correctly

 
The die should be face down on the cardstock


  The layering order for the Bigz (L and XL and Original) Dies is simply 

  • a cutting plate
  • the die itself facing up so that you have the foam side exposed. The multipurpose platform is not used with these type of dies
  • the card stock positioned over the die
  • topped with the second cutting plate OR use crease pad instead if you have fold lines eg mini milk carton or scallop envelope

113462 Scallop Envelope Bigz Die


The layering using the cutting pad on the top
The layering using the crease pad on the top


How to use your Big Shot, is most easily seen by demonstration and you can see this on the SU video or ask me to demo the machine and dies for you. 

Go to my Big Shot HINTS AND TIPS to learn more about using your big shot and trouble shooting.
If you have any questions or want to clarify what I have written, please send me an e-mail.  I hope this information is useful and please if you have any additions let me know so I can add them.

Do enjoy creating with this wonderful machine, it truely adds another dimension to craft as a whole.


Friday, July 13, 2012

Framelits Dies (Labels Collection), Edgelits Dies & EF (Adorning Accents)

The SU Autumn - Winter Mini catalogue for 2012 is full of wonderful things stamps, tools and accessories / dies for the Big Shot machine.

Tonight's highlight is on Adorning Accents - the name given to the range of Edgelits Dies and the coordinating Textured Impressions Embossing Folders.  Rach who I consider a very dear friend, and I got our creative heads together one evening and came up with this example for me to demonstrate at an upcoming workshop.  I don't know about you, but I really love the design and so followed many more colour and embossing combinations.  I will share only a few with you...
Colours - Blushing Bride and Rich Razzleberry
Stamp set (W119163 / 120003) Cottage Garden

Colours - Blushing Bride and Rich Razzleberry
Stamp set 115898 Upsy Daisy

Colours - Island Indego and Wisteria
Stamp set 115898 Upsy Daisy

Colours - Blushing Bride and Lucky Limeade
Stamp set 121522 Friends Never Fade

Colours - Island Indigo and Pool Party
Stamp set 119163 Cottage Garden

Colours - Pool Party and Island Indigo
Stamp set 119175 Medallion & 121560 Perfect Punches

This is a great workshop to learn how to use wafer thin dies and embossing folders in your Big Shot.  If you are interested in learning more please e-mail me.

Enjoy your craft

Ornament Punch Art

This is a beautiful punch used mainly for Christmas, but I wanted to show you how I've used it for Christmas cards... and a little more.
The photo is not great, late at night is the only chance I get to take photos, but the idea is to show you a 3D example (LHS) of the punch and the punched out image popped onto the card (RHS).  I have used Confetti white, and real red on the LHS, Whisper white and Real red on the RHS example.  I used 121502 Delightful Decorations on both with 121500 Curly Cute and dry embossed the RHS example with 120175 Vintage Wallpaper scuffed with real red.


I do love this punch and coordinating stamp sets, in this case 121502 Delightful Decorations with 116340 Baroque Motifs and 115930 Many Merry Messages in Real Red and Garden Green yes with a little glitter and diamonds
Even when you layer this punched image it simply looks great.  121498 Contempo Christmas, glitter on poppy parade and pear pizzazz highlighting.  I made over 20 of these for people on my Christmas card list.

In reverse colours and diamonds for the Delightful Decorations centres.

So how else you can use it ? - flowers, a vase, tags or even fish (coupled with sections of the 5-petaled flower punch 119880)
There is more you can do with this punch - you can make a magnolia flower, an acorn and use it as a face for an angel or the body of an angel, squirrel or gum nut baby, just to name a few.

I will endeavour to add another sample card of ideas including the angels and any more ideas I have stumbled upon on our SU demonstrator site and everyone's best friend "Google".

Bye for now


Big Shot - hints and tips

The big shot machine can cut, score and or emboss your card, and a variety of other media.  I promised the wonderful ladies from the resort I deliver workshops at, that I would post top 12 hints and tips for the Big Shot that I have learned.  I will go into more detail with photos in the next post.

The Big Shot with an example of an Embosslit Die, Textured Impressions Embossing Folder, Sizzlits Die and Bigz Die,

 1.  Safety first!  Always ensure you have the suction caps adhered to the table so that the Big Shot does not move whilst you are using it

2. Ensure you have chosen the correct spacing plates - Remember if the handle is too hard to turn then you need to reduce the spacing plates, if your embossed image is faint or an image is not cut out properly increase your shims - a piece of thin hard plastic or card works just fine.  Add one at a time to the stack to increase thickness.

3. When ever possible use your clear plates as a ramp working towards the die, embossing folder etc.

4. When you run your embossing folder or embosslits die through the machine ensure you follow the instructions on the Embosslit Die and have the said surface facing down AND ensure you have the spine/hinge of the die or folder running square into the big shot.  The hinge should be the last structure to go through the big shot parallel to the roller.

5. The big shot is a very versatile machine and can be used to cut card, material, felt, cork sheets, thin craft metal and much more.

6. SU Dies can cut comfortably through 3 sheets of SU card - NB if there is perferations eg two tags or top note then limit your card to two layers, otherwise you will loose the crisp perferations.

7. If there are score lines in the die then use the crease pad.  The crease pad gives a beautiful fold line for you to employ.  If you don't have a crease pad use a bone to compress the fibres of the card so that you can get a clean fold.

8. Use your cutting dies first THEN emboss with an embossing folder to get a crisp embossed finish.  If you want a dull finish to the embossing folder then do it the other way around ie emboss and then cut.

9. When you first use your dies or embosslits use a scrap piece of paper so that any excess foam and or oil on the blade is picked up.

10. For detailed dies eg paper doily sizzlits use a sheet of grease proof paper face down, directly on the die then add your sheet of paper.  The waxed paper is slippery and most of the small pieces of the card will fall out much more easily (yaaayy)

11. The edgelits are made (due to length and blade shape) to feed in the big shot 90 degrees to the roller, ie perpendicular to the handle.  Both edgelits in the Finishing Touches must be used this way.  I have gotten away with using the Adorning Accents Edgelits parallel to the roller but some users do find this difficult ie the blade does not cut the card or the card is cut crookedly because the die moves.

12. Use post it notes (or alike) to hold the waffer thin dies - edgelits or framelits - in place ie to minimise die slip when cutting through the big shot.  This is especially great for lining up the stamped images of the ornament keepsake bundle with the framelits die and this also enables you to use the edgelits parallel to the edge of your card.

13. Lucky last tip.  The clear plates will score and are disposable.  These are your cutting surface, NOT the white platform. So don't stress that they are marking, they are made of a material that buffers the blades in your dies and this plate protects the roller mechism that induces the pressure to mimic a press.

I hope these hints and tips help you when using your Big Shot and please if you have any questions or want any points clarified, send me an e-mail.

Happy crafting with this wonderful machine.


Thursday, July 12, 2012

Triple Treat Flower

I have been inspired by Ailsa and Tammy to stamp a few of these beautiful flowers out and play - and coupled with a very good friend's Birthday which is coming up,  I made the following cards.

Stampin' Up! Triple Treat Flower is stamped in Pink Pirouette and Pear Pizzazz and punched out using Stampin' Up! coordinating punches.  The background is dry embossed with 123134 Houndstooth embossing folder and the birthday wish is from the 116416 Sincere Salutations.  The ribbon is from SAB, the Pearls (119247)  and the little swirls in the background (113441), captured below are all Stampin' Up!  products...
A Crafty Cat - Demonstrator Carol McCarron Stampin' Up! Triple Treat Flower on pink pirouette card stock

I popped the 5 petal flower (119880) from the (118073) fancy flower with dimensionals.  I just love the 123134 Houndstooth embossing folder, I must admit it is one I did not think I would use and yet I am drawn towards it very often...

A Crafty Cat - Demonstrator Carol McCarron Stampin' Up! Triple Treat Flower on pink pirouette card stock
Wisteria Wonder  and Certain Celery card with Blushing Bride and Pear Pizzaz ink, ribbon and button.  On this one I used the Rhinestones to highlight the 5-petal flower.
A Crafty Cat - Demonstrator Carol McCarron Stampin' Up! Triple Treat Flower on Wisteria Wonder card stock
The colours are not true here so I apoligise for the poor quality of the photo.  I used Wisteria Wonder, Pear Pizzaz and Pink Pirouette in ink, ribbon and card.  I double embossed the lower section of the with the 123128 Stripes and 117335 Perfect Polka Dots SU embossing folders.

A Crafty Cat - Demonstrator Carol McCarron Stampin' Up! Triple Treat Flower on Pear Pizzaz card stock

A closer look to see the layering and rhinestone placement on this lovely stamp and the concentric layering of the punched out images...
A Crafty Cat - Demonstrator Carol McCarron Stampin' Up! Triple Treat Flower.
This stamp is truly a pleasure to play with, so if you have it, share with me your creations.
Stay warm and dry and enjoy your stamping.
 
Love