Showing posts with label Dinosaur Train. Show all posts

Tuesday, July 1, 2014

A Dinosaur Train Birthday Party - Gluten Free Carrot exploding volcano cakes

Benjamin wanted a Dinosaur Train themed birthday party and since it was his day, I wanted to treat him to be able to eat anything he wanted.  I have posted A Dinosaur Train Birthday Party - The Food & Healthy Eating showing the foods we chose and knew would be eaten by everyone.  The following posts are the recipes we used to enhance the theme of a Dinosaur Train Party, complimented with character specific food labels designed using Stampin' Up! My Digital Studio. 

The Exploding Volcano Cakes were Gluten Free Carrot cakes with coloured icing dripped from the tops...
Carrot Cake - Exploding Volcano Cakes Yummmm, my personal favourite.

 
This Gluten Free carrot cake is recipe #1158 from Best Recipes
I don't think I've deviated from the original recipe but this is what we use and it is just divine.

CAKE INGREDIENTS
3/4 Cup Oil - we use Macadamia nut oil (yummm)
1 tsp Pure Vanilla extract
1 1/2 cup grated Organic Carrots
1/2 cup chopped Walnuts
1 1/2 tsp Gluten free baking powder
3/4 cup Rapadura or sugar of your choice
2 Organic eggs
1/2 cup Organic Sultanas
1 cup Gluten Free Self Raising Flour
1/2 tsp cinnamon

METHOD
Beat oil, sugar and vanilla into a bowl with an electric mixer until well combined
Add eggs and continue to beat until light and creamy
Stir through carrot, sultanas and walnuts
Sift flour, baking powder and cinnamon into mixture and mix well
Pour mixture into a lightly greased and lined prepared cake tin or spoon into muffin moulds
Bake in a moderate oven for 50 -55 mins or until cooked

ICING INGREDIENTS
2 Tbsps reduced fat cream cheese
1/2 tsp Pure Vanilla extract
2 teaspoons softened butter or Nutlex
3/4 cup pure Gluten Free icing sugar

METHOD
Beat cream cheese, margarine and vanilla together in a bowl
add icing sugar and colour with food colouring as you wish
mix well and use knife to spread over cakes - in our case we piped the two colours starting in the centre of the cakes/muffins and drawing the icing out over the side until it naturally broke, giving the effect of lava.

Now this is MY all time favourite, non chocolate cake and the ONLY carrot cake I have ever enjoyed, in fact I LOVE IT and will often choose it over a chocolate cake - yep I think it is that good.

Enjoy Gluten Free whilst you craft,
Love and happy crafting

Monday, June 30, 2014

A Dinosaur Train Birthday Party - Gluten Free Chocolate and Macadamia Nut Brownies/Fossil Dig Slice

Benjamin wanted a Dinosaur Train themed birthday party and since it was his day, I wanted to treat him to be able to eat anything he wanted.  I have posted A Dinosaur Train Birthday Party - The Food & Healthy Eating showing the foods we chose and knew would be eaten by everyone.  The following posts are the recipes we used to enhance the theme of a Dinosaur Train Party, complimented with character specific food labels designed using Stampin' Up! My Digital Studio. 

The Fossil Dig Slice was Gluten Free Chocolate and Macadamia Nut Brownie, the nuts looking like fossils buried in mud...
The Fossil Dig Slice was one of the Gluten Free foods offered at Ben's Dinosaur Train Birthday Party.
This recipe is one of my own, so I do hope you enjoy it

INGREDIENTS
180g organic butter or Nutlex softened
225g Dark chocolate or dairy free replacement
         (we use Lindt 85% and it does not seem to make us sick)
1/3 cup organic Rice Milk
3 lge organic Eggs
1 cup organic Gluten Free plain Flour
1/4 tsp Gluten Free Baking powder
1/2 cup organic Almond Meal
1 cup organic Rapadura or sugar of your choice
1/2 organic Cacao powder
1 cup Organic Raw Macadamia nuts chopped into quarters

METHOD
  1. Preheat oven to 150 - 180 degree Celsius (depends on your oven really and if it is fan forced or not)
  2. In a double boiler melt chocolate and butter together until smooth and there are no lumps
  3. Combine to a uniform dry ingredient mix,  flour, nut meal, sugar, baking powder and cacao in a bowl
  4. Make a well in the dry ingredients and add eggs and milk
  5. Lightly whisk the eggs and milk together without adding too much of the dry ingredients
  6. To the well add the melted butter and chocolate and mix well
  7. Add Macadamia nuts and mix through the mixture until evenly distributed
  8. Pour into a prepared square cake tin
  9. Bake for 40 mins or until cooked
  10. Cool on wire rack
This is Pete's sister's favourite brownie recipe, hope this becomes one of your too.
Love and kisses

Saturday, June 28, 2014

A Dinosaur Train Birthday Party - Gluten Free Chocolate volcano cakes

Benjamin wanted a Dinosaur Train themed birthday party and since it was his day, I wanted to treat him to be able to eat anything he wanted.  I have posted A Dinosaur Train Birthday Party - The Food & Healthy Eating showing the foods we chose and knew would be eaten by everyone.  The following posts are the recipes we used to enhance the theme of a Dinosaur Train Party, complimented with character specific food labels designed using Stampin' Up! My Digital Studio. 

The Exploding Volcano Cakes were Gluten Free friands with coloured icing dripped from the tops...

Gluten Free Chocolate volcano cakes
This recipe is one from my dearest friend Sue.  She inspires me in the food department... inspires or corrupts, you tell me after you have tried these beautiful Gluten Free Chocolate cakes.

INGREDIENTS
150gms organic butter or Nuttlex melted
1 1/3 cup pure gluten free Icing Sugar sifted
1 cup organic almond meal
1/3 cup hazelnut meat
1/2 cup cacao
5 egg whites whisked until peaks form
1 tsp Pure Vanilla extract

METHOD
Preheat oven to 160 degrees Celsius (fan forced)
Mix icing sugar, cacao and nut meals in a bowl until well combined
Mix through melted butter and vanilla
Gently fold through whisked egg whites
Pour into friend / muffin tin
Bake for 10-15 minutes or until cooked
Ice or dust with icing sugar or cacao.

These were my sweet chocolate treats I lived on for many years before having the confidence to experiment with cooking.  Enjoy and let me know what you think.

Friday, May 23, 2014

Step-side Cards - Version 2

To show case the second version of the side step card and use of Stampin' Up! stamps, I've saved my favourite for this post...this is a side step card also, but has two valleys and three mountains.  This is the same template I used for Ben's 4th Birthday card invitation. 

The card fold template - noting that the cut line can be moved to the left or right to suit your card...

Heather Baker, this is beautiful and so purrrfect to welcome a little girl  LOVE IT ...
In pink pirouette, the card is lightly embossed with small hearts (non-SU) and sponged in Melon Mambo.

The card is accentuated with the animals from Stampin' Up! rubber stamp set "Zoo Babies"

The verse was printed out on Whisper White card stock...

Isn't it just gorgeous!  The brads really finish it off as does the little fold of ribbon/clothing poking out of the draw.

Now for a little boy, again thanks to Heather Baker
Heather's beautiful Step Side card featuring Stampin' Up! Zoo Babies.
This is such a beautiful card fold and as you can see from this and the previous post, you can dress it up anyway you wish.  Love it.

Thank you for stopping by, hope to see you soon
Stay warm

Monday, May 12, 2014

A Dinosaur Train Birthday Party - The Fossil Dig

The children's program, Dinosaur Train has been in our house for just over 18months now and I cannot speak highly enough of it.  This year my gorgeous son wanted a Dinosaur Train themed Birthday party and of course that meant a fossil dig......
The boys in the sand pit digging, looking, searching for fossils.
To start I had to make the fossils - plaster of paris was the medium with which we worked with.  I had to employ my husband to tap the Vaseline lined moulds as I made and poured the liquid in.  He then set them in pre made sand moulds to hold them horizontally.  We were able to make two of each mould on the first day so two and a bit days later, we got our three bodies - skeletons??


It was so much fun burying them and then denoting their locations with cute signage :-)
I put little signs featuring Dinosaur Train characters, to tell the children/adults where to dig

I put little signs featuring Dinosaur Train characters, to tell the children/adults where to dig
It rained on the party day so we waited for the ground to dry out and went fossil hunting with a couple of Ben's friends. 

Then the dig began
the find - a skull!
and fossils were discovered...
Brush, Brush
and uncovered...more brush, brushing
 
 
and then carefully moved and reconstructed...


 Love the finished products...

 
Sadly only two of the fossil bodies survived the rain - I must not have mixed the plaster of paris up correctly or I did not give it enough time to dry before burying the pieces - not sure what I did incorrectly there - maybe a bit of both.

Because this was enjoyed so much by the children, we are going to rebury these in the kindy sand pit so the entire class can discover the excitement of being a palaeontologist.

Saturday, May 10, 2014

A Dinosaur Train Party - Dinosaur Tail Pattern

Dress up is so much fun, and I found out how much fun it can be with these dinosaur tails, made for my son's Dinosaur Train themed 4th Birthday party. 


Our gorgeous son in his dinosaur costume.
I found one awesome site RUNNING WITH SCISSORS detailing how to make dinosaur tails, and it is this site that inspired me to make dinosaur tails for my son's 4th Birthday party themed after Dinosaur Train.   I am not an experience sewer, hence I wanted to minimise my time at the machine.  I decided to use the fold of the material to minimise one sewing edge of the tail and I used stiff felt instead of sewing the armour/sails endemic to each species of armoured dinosaur and I wanted more than the generic spikes of the Giganotosaurus.  I also wanted to remove the stuffing easily for washing and I wanted to stuff these tails cheaply - with shredded paper. 

So how did I do this? my instructions are probably not as good as running with scissors, but please go back to their site and go through the detail - my pictures should then make sense.  I did my tails in expensive patchwork material - it was soooooo pretty and scale like! and I allowed 30 inches per tail.  A much cheaper version would be in basic one colour fabric.  I free hand drew the tail shape onto Stampin' Up! packing paper - as you can see used, but never the less it did the job.


The first step was the pattern, I made my tails 25" long and ran the flatter side along the fold line.  The tails were 10 1/4" wide - 20 1/2 when the fold is opened flat.   The straps varied but 12" seemed to work (ND need 2 of these ie 4 in total if not on a fold line) and the 3/4 circle diameter was  6 1/2".  I used one of my son's cereal plates. 
This is the pattern cut out and pinned ready for sewing.  Yes that is my mud map/pattern in the top RHS corner...
 
I cut these shapes out of stiff felt.  I have degeneration in my shoulders, along with arthritis in my hands so I wanted to minimise sewing.  I did end up cutting two each for the tails of the Steg and Wuerhosaurus...just to be anatomically correct!

 The spikes/armour was placed inside as show below with the spikes facing toward the fold line.  These are the pieces after sewing.

And pin the straps inside of the tail (which is inside out) AFTER you have added your Velcro - sorry I didn't photograph the Velcro on the straps.

You may need to pin the first spike out of sewing ways harm ...
These are the circular pieces set on each other to make a circle.  This is the entry point to stuff the tail and although none of our stuffing came out, you may like to add a clip, spot of Velcro or a button to seal the opening more securely. 
I doubled sewed for strength and appearance more than anything.
This is the circle pinned on - note the pencil marks...I used these to line up with the inside of the tail to ensure even ruffling/gathering.
 Once this was sewn on, turn them inside out and stuff them...

 The tails on display, ready for the picking

 Stegosaurus

Hesperosaurus

 Wuerhosaurus,

 Giganotosaurus

A very BIG thank you to Running with Scissors for inspiring me to sew Dinosaur Tails for our wonderful son.  I hope you have as much fun with these at your party as we did.

Friday, May 9, 2014

A Dinosaur Train Birthday Party - Party Favours

The finale for the Dinosaur Train themed 4th Birthday party held for our wonderfully gorgeous son, was the opening of presents and subsequent handing out of party favours/bags  (thank you gift bags) as children left for home. 
 
I had purchased some groovy bags but on opening said bags, they were soooooo small and would not fit what we had chosen to go in them - no NO LOLLIES or CHOCOLATES, fun things like a train whistle, stress dinosaurs, dinosaur glider, dinosaur magnifying glass, dinosaur sprinkles and Dinosaur Train stickers.
 
So what to do, but turn to pinterest - yes my most favourite internet tool :-) and what did Ben and I find,  Paper Mache eggs.."Dinosaur eggs" as Ben commented in wonderment.  We use the flour and water mix to glue pieces of paper on blown up balloons and hung them to dry.  Ben helped the first day, hence the thick paste which took two days with the help of a hair dryer to dry! and that big gluey mess that took me awhile to scrub off the bench.  But all in good fun, we used newspaper for the first layer and the brown Stampin' Up! packaging paper for the outer layer - looked great.

Where the balloon end poked out, is where I not only took opportunity to pop the balloons, but to cut a zig zag long enough to push the little gifts through.  This also acted as an access point for the children as I can assure you, it was not easy to cut or rip or get into without that initial cut!

Peek-a-boo, oh look what is inside!
 
The dinosaur foam gliders were a great addition and enjoyed by all.  If it had not been raining, I had intended on a glider race - now that would have been fun! 

The egg shells looked great sitting around the place and I really liked the contrast of the white interior to the brown exterior.
Paper Mache egg shell used as the party favours.

What a great end to the party, kids blowing their train whistles, stretching dinosaurs and building gliders.  There were glittery dinosaurs on the ground, some children were inspecting them with their dinosaur magnifying glass that was to be used in the fossil dig.  Never mind, the children found other things to look at :-)

Thursday, May 8, 2014

A Dinosaur Train Birthday Party - The Cake, Ol Spinosaurus

My son wanted a 3D cake of Ol Spinosaurus, for his 4th Birthday.  For those who don't know, Ol Spinosaurus is a character from Dinosaur Train, a wonderful Jim Henson production, that my now 4 year old, has loved for the past 18months.

We searched high and low for a suitable cake tin, but settled on a Dolly Varden cake tin to make the body, two of that is, so we could get the foot ball shaped body we were chasing.  I have chronic fatigue along with a couple of other conditions, so I am open to all of the help I can get as I cannot stay up to all hours icing a cake or stressing because I simply don't have a clue what to do.  Now I knew this cake would be a challenge, so I called on a lovely friend of mine and we put our heads together.  Janette is the expert on which icing to use, makes it and colours it.  I was the eternal optimist.  Now I must confess we did try to cut down a soccer ball, but this didn't work at all; the gluten free cake did not cook through and crumbled into a hundred pieces.  We tried a couple of recipes to find one that stuck.

We cooked two of these; one gluten cake, the other a gluten free cake.
So, I make up recipes and my hubby is the cook.  We made a "normal" chocolate gluten cake as they are lighter and stronger than a gluten free cake and then he made a chocolate gluten free cake - heavy and brittle.  But I figured that the GF cake could sit on the cake board and we could lift the gluten cake and attach the head to it.  We also made GF round cakes and volcano shaped cakes that could be cut into hips.  We added choc chips to these so they gave another texture for those that ate the hips.

We tried the circles for the legs but they just weren't the right shape, the volcanoes were the perfect shape with a small amount of shaping.
The secret of cooking these cakes through was the cooking rod.  The two dolly varden cakes were joined with Royal icing, shaped and set on a pre-prepared 55cm circular cake board, which was covered in marbled blue fondant - Janette's forte. I shaped and made the hind legs out of gluten free cake by cutting the small volcano shaped cakes and set them against the body. 

I then made flowers out of flower paste whilst Janette worked her magic making his skin.
The flowers and leaves were chosen by Benjamin, in the background you can see the Dry Ice gently smoking
 Janette had prepared the sail the night before out of flower paste so it was hard and easy to work with. Together we lay the skin over the body and add the contrasting brown and then we textured it with an embossing folder.   Janette set the sail into the cake as I made small balls out of fondant that were then shaped by Janette into the spines along the dinosaur 's back. This is what helped to hold the large sail in place.  The cake is not only taking shape but form as well ...how good and REAL does this look!  The cake is not only taking shape but form as well ...how good and REAL does this look!

The tail was next and Janette made a purrrfect tail out of fondant.
 
Janette then made the wave of marbled blue fondant to encompass the dinosaur's body to ensure the effect of him being in the big pond/water.  We placed this around the body, rolling and forming this long thin piece of fondant.  I think this worked wonderfully. 

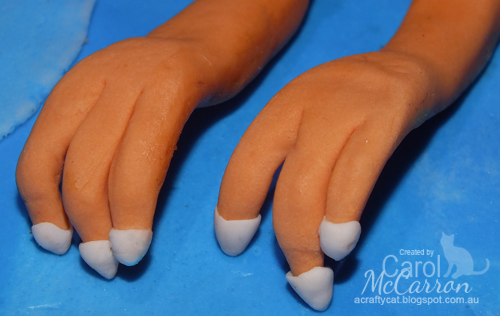
Janette had also prepared the front legs the night before out of flower paste and added white claws. 


I shaped a Styrofoam ball backed by a cube (joined with a skewer) to make the dinosaur 's head and neck whilst Janette worked her magic on a two layer skin.  The first layer is the one she shaped around the Styrofoam structure, the second was the skin and contrasting brown fondant.  Janette then worked on the jaws, added the mouth and tongue and joined this to the head with skewers and textured it.  We maintained the mouth shape this skewers and shaped a wad of paper towel until the structure stabilised.  The head was joined to the body with a long wooden rod.    

There were support skewers coming out of everywhere...and he looked so funny with out teeth

The eyes were created and added by Janette along with final touches of skin texture by gently pressing the embossing folder over the icing.


Then the head. The mouth, tongue and teeth were made from flower paste and left to dry hard.
The teeth along with the birthday cake banner were the last additions to be added.


The finishing touch was the dry ice - which looked spectacular and fascinated the children.  That was the most fun of the whole thing.  Ol Spinosaurus lives in the big pond and it is thought that the waters were swampy and steamy.

A HUGE thank you to Janette Hopgood and her family for putting up with us for two evenings as we clothed the body, Lex and my husband for the support with cooking, transporting, cleaning, driving and dry ice and thank you to those that photographed this amazing creation - Shell, Sally, Matt, Heather and Rachael Joy Photography.
The finished product, candles alight, dry ice misting...
 I know Ben just loved him, I think it was all a bit surreal...seeing his favourite dinosaur in the shape of a cake in the foggy big pond; and he was able to share this with his friends and family.